Thursday, November 18, 2010

Non-Fuel System Repairs

The wings are out to be painted, so more working on the fuselage.

Remember the last stringer repair? Further inspection found that the stringer below it was split, as well. Had been split a long time - there was near-petrified electrical tape holding the wood together.

While not a critical to airworthiness repair, it needed repair, and I wasn't going to let it pass me by. Replacing the stringer would involve cutting into the fuselage, and having to recover the whole plane - so a temporary sandwich repair it is.

Then on to putting on the bungee cover - first, to shortening the center screws so they neither penetrate the fabric, nor stand the cover off the plane. You can grind screws down easily enough, but getting ground-short screws through the thick material would be a problem. Obvious solution: insert the screws, then grind them down. I almost kept the paint job intact, too.

My IA started inspecting the landing gear and tail, and revealed most everything airworthy, but in dire need of more lubrication. While looking at the gear legs, he noticed a few bumps that were not part of the smooth structure, but didn't quite look like the massive corrosion bubbling the paint they appeared to be. Can you see what's odd about this picture?


Look near the top of each tube of the gear leg. Underneath the paint and primer, undisturbed for years, were two small screws in #40 holes right above reach bolt that needs to be lubricated. Instead of putting high-wicking oil where we could reach and hoping it would get inside, there were actual lubrication ports, kept clean and clear by little screws - very old screws, by the common-head style. So I chipped the paint off, unscrewed them, put LPS3 inside, and screwed them back down. Those will definitely be used from now on!

The fabric near the gear legs had some wrinkles that were then carefully ironed out - when patching a plane, if you do not carefully patch so that the new fabric draws the old fabric tight, you'll never get the old fabric to lay quite right without ironing it again. It's a purely cosmetic thing, but I want her to look pretty, so I did it. Then, for reduced drag and increased beauty, I put the fairings back on over the freshly lubricated bolts on each leg. They'll stay there until next annual - this part of the plane is done!

Tuesday, November 16, 2010

Drawing The Line

So, the plane is almost done. One fuel valve to put in, a new hose, run the engine, inspect a couple cables, fairings back on, and we're done.

Except the wings. I finished them, and then checked around the field. The restoration shop with a really nice paint booth and a good reputation said it'd take a week before they could take them in, and then it'd take a week to get the second coat of dope, the silver, and the color coats sprayed on. That would be as of last Friday.

So Monday, yesterday, I went in to check how we're moving the wings back over - my IA's trailer or theirs? ...And my wings are still sitting there, no second coat of dope, no silver, no color, looking almost like when I dropped them off. I can tell there's been a little detail work - they do look nicer, the fabric is more taut. But they're not done. And after being handed the rather lame excuse of "Some of my guys were sick, some went on vacation..." despite seeing his guys working on new wings that weren't there a week ago, I was told that they'll get it done "around the first." That's two more weeks. That's four weeks since they were ready to spray.

That's I'm damned well pissed off at the shop.

That's missing Thanksgiving with my husband, and being held up for at least two more weeks.. if they manage to stick to their new timeline... and given the way they're going, getting the conformity inspection and paperwork done may put me into not only missing Thanksgiving, but Christmas with my husband.

No matter how much I want to push it out on the ramp and set it on fire, at worst I'm just going to sell this damned plane as a project and eat the loss in time and money. I can finally go home, get a job, and just save up to buy an actual working flying airplane instead of throwing good money after bad anymore. At best, I'm going to throw my hands in the air, tell my IA I don't give a flying fuck anymore, I'm going home and he can finish it and send me the bill. I am not missing Christmas with my husband. He's more important than this pile of "almost there! another few weeks!" that's going on seven months now.

Tuesday, November 9, 2010

Door Frames

Sometimes even the little things can take hours to diagnose and fix. For example, one of wooden parts of the door frame was wobbly on both doors. This particular chunk of wood is the most common one to grab when getting in and out, so this isn't surprising. I took the right side's striker plate, and found the bolt beneath that holds the wood to the frame was loose (see cleaned-up hardware below.)


Then, I tackled the left side.


Note the stringer behind the frame is cracked.


After getting the striker plate off, I found a bolt with a broken-off head (at the tip of the scribe.) I also found, though the picture doesn't show it well, that lots of wood had been replaced with wood putty, including the holes for the bottom striker plate screw and the wood attach bolt.


Reaching around to the back, there was no bolt sticking out, and no nut. The picture below shows the top nutplate for the striker plate attach screw,and the metal tab welded on the fuselage where the wood is bolted on.


The broken-off bolt did not come out gracefully. In fact, it split the wood, and knocked out the prior putty repair on the way out. Why? Turns out, instead of going through the fuselage tab, it had been stuck into the bottom striker plate attach's nutplate, and corroded into a solid lump. There were more holes than there should be, and everything was going the wrong way.


Which holes were original, and where are the screws were supposed to go? Scribes are awfully handy tools for checking this!


Then I spread the wood apart so I could fill the entire thing with glue, then clamped the it back together for a tight repair. When it cures, I'll put in more wood putty and nail another nutplate on the back. This time, the attach points will be correct!

This will be a good, solid, airworthy fix - but it's not going look as good as the original. Next winter, when there's downtime I'm not flying, I'll make a new door post and replace the repaired one with a new piece of wood.


I also added reinforcement pieces to the cracked stringer, to hold it until I reskin the fuselage in a few years.


While waiting for the glue to dry, I finished painting the striker plates.


The left plate is ready to go back on - I'll pick up the hardware and install it today.

Looking Closer

After walking a few miles to work through 6 inches of snow on ice, I started the work day already dog-tired.


Look again at that tire - the dirt on a tire tells you a lot about how the airplane is riding. If the dirt is all at the center,the tire is probably overpressured. If it's way out and wide, the tire has too little air pressure. In this case, the airplane is riding way high and centered because it's missing a significant fraction of usual weight - no wings, no fuel, no passengers or pilot... If you see this on a working plane, you need to fix it.


See how the dark stain starts where the exhaust pipe comes out of the engine, not where the exhaust coming out of the pipe might stream back and hit the skin? That's a good indication that I had an exhaust leak.


Sometimes just looking at the plane for a while without anything in mind lets me see new things. For example, when lying on my back and looking at the bungees, I noticed a few fragments of hide of nauga sticking out from under the metal plate behind the bungees. The mud flap was not supposed to hang down, after all, like a mud flap on a truck - it was once tucked underneath the rear metal plate and screwed down, like a very flexible inspection cover.

When I took it off, three fragments of nauga came with, and a sizeable rock. Clearly, the small potion left wasn't doing its job - I should check inside the belly for any other rocks or dirt I can clean out and lighten my plane. In the meantime,here's a shot of the rear cover in the paint booth.

Sunday, November 7, 2010

No More Pumpkins


They're so lucky that that discharge of firearms, except in defense of life or property, is illegal in the city of Anchorage. Just look at all that nice, wonderful, well-marbled, wild, organic, free-range moose meat begging to be taken out, and save next spring's flowerbeds, saplings, and gardens!

Saturday, November 6, 2010

Progress Post, Saturday Edition

Wings are now out to the paint booth. They're not perfect, and I missed spots where I should have noticed pinked edges sticking up, or not enough dope. They will not look nearly as nice as most wings this rebuild/repair shop puts out, but they're my first wings, and hell, they're airworthy.


My IA had thoroughly inspected the work on the engine, and found two errors - one control cable had not been secured with a cotter pin through the bolt, and the engine mount was missing the last bolt to secure it to the rewelded exhaust. Those were promptly accomplished, first thing after moving wings.


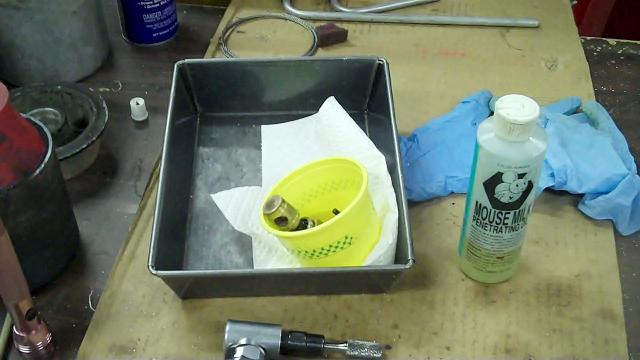
The wicking power of Mouse Milk - left alone for a day, the cup soaking the valve emptied itself, as the creeping oil crawled out of the tub and down into the oil pan. Fortunately, the paper towel did a good job of absorbing most before it could get further.


Drilling oversize holes for the window screws.


New windows installed - the different sizes of PK screws are because any loose screws were replaced with the next size up until secure According to my IA, I can pull this trick successfully for a few times, and then it's time to replace the wood. That's a few years off, yet - I have no intention of tearing down the fuselage to replace stringers until I've flown this plane quite heavily.


The paint on the leg fairings were flaking badly - on one fairing, only a few thumbnail-sized patches were left, and on the other, half the paint was gone. So, after pulling them to inspect the gear attach points beneath, I stripped the last bits of paint, cleaned them, primed, and painted. There was no yellow to match either the body or the new wing color, so I went with basic black - it matches everything. As a note, use flat black when you don't want people to look at things, and glossy black when you want people to notice.


As long as I'm painting parts, I'm might as well work on the few places on the plane left bare aluminum by the last owner, like these tail inspection covers and the mud flap.


Cleaned and being primed in the paint booth:


Painted, and ready for installation after inspection.


The old mud flap was pretty beaten up.


Primed and painted, but not yet dry:


The old mud flap appeared to be made from the hide a of Nauga. I used a better material, made for engine baffles, for the new one.

Wednesday, November 3, 2010

Airbox and Awesome Food

The first problem with removing the gascolator (after getting the safety wire out of the way) is finding a place that a tool can grip it without harming it. Fortunately, with all the years in service, I only had to look for the part scarred by all the tool marks. This told me that something like vise grips had been used - but very, very narrow vise grips with a deep throat.

For every really frustrating problem, there is a nifty tool. In this case, needlenose vise grips!

Which led to this:

And then, back to the adjustable wrench to get the fuel filter out from the boost pump, too.

On to the airbox again! First, I found the right filter. The new filter is damp with "wettant", an oily substance that makes the foam perfect for trapping dust and dirt. This means everything gets both oily and sticky after handling or being near the filter. I found replacement hardware to hold a grate to the bracket - this is obviously for filter retention. The other bolts appeared to hold the bracket to the airbox.


The bolts to attach the filter bracket to the airbox are shorter than the airbox filter bracket is deep. Yes, this confused me, too.

As my IA was out of the shop, I biked over to Reeve Air Motive where the owner pulled out a brand new filter bracket, showed the hardware to me, and demonstrated how to install it. He rocks! I then bought brand new bolts for the bracket, and a new gasket for the gascolator, and we compared our trick or treater quantities and costumes.

This took an hour, because as I biked to Reeve's through three inches of slush past Captain Chuck's, I smelled the delicious food wafting from the restaurant. As I biked back, I saw a friend's vehicle in the parking lot, and my stomach urged me to go say hi. Right Now.

The cook and owner was making a spicy chicken soup that nearly gave me a foodgasm - it's awesome, possibly only bested by her incredible biscuits and gravy. Not your mother's chicken soup, this started with a jambalaya base, then had heavy cream added, and a fiery smoky kick with generous amounts of chipotle. Seriously, if you're in or coming through Anchorage, go to Captain Chucks. It's where the chef goes to play in the kitchen, and serves food that bests fifty-buck-a-plate places - at diner prices! (Caveat: if the chef's husband has left to pick up the kids or pick up supplies, you can darn well flag down the chef politely and ask her to ring you out, or give her your order yourself. Being a restaurant run by two people, the service is great for two people. It's not a hovering-waiter-per-table kind of place.)

Anyway, after finding her to pay and ending up in a wonderful conversation about the similarities in spice mixes of Italian and Cajun cooking, it was back through the slush to the salt mines... or at least, airbox assembly.

Those bolts are shorter than the length of the bracket because they go underneath the filter, and the holes on the outside are for putting the screwdriver into the bracket to hold the screws.

Cleaned up the valve cores & disassembled two of them. This involved a bath and scrubbing in the acid tank, as the "valve lube" had more in common with chewing gum, molasses, and tar than lubricant. Once disassembled, I scrubbed each part with brakekleen. Handy stuff!


The third valve core, upon refusing to come apart at my full strength after being cleaned as well as I could, is being given an overnight bath in Mouse Milk, a very effective penetrating oil. The tub with the oil is isolated on an absorbent paper towel inside an oil pan, because this stuff creeps and wicks like it's trying to take over the world.


Unfortunately, what I thought was just my lungs rebelling from avgas, brakekleen, and acid tank fumes turned out to be a harbinger of my host's sickness infesting my lungs. Fortunately, people are wonderful and kindhearted, and I neither had to bike through the slush home, nor bike to work in the morning. Overall, people are awesome and kind, and I am very grateful for that.